
How to Build Your Own Chatgpt Operator — Free & Locally

After weeks of buzz, OpenAI has released Operator, their first AI agent. Operator is a web application that can perform simple online tasks in a browser, such as booking concert tickets or filling out an online grocery order.
The entire process is done through the cloud, not your local computer. AI will activate the browser on a server and complete the user’s specified tasks.
Operator isn’t worth its $200-per-month ChatGPT Pro subscription yet because it currently only handles basic tasks, can break easily when a website changes its layout or interface and is limited to specific sites that OpenAI has partnered with, making it unclear if Operator can interact with other websites.
I highly recommend you watch my video for a better understanding
If you have been following me for a long time, I have covered a video about browser_use that allows AI agents to operate websites, which has been gaining attention. This tool allows AI to operate websites freely on our behalf, almost like magic.
For example, if you ask an AI to “find the cheapest one-way flight from New York to Spain on Google Flights,” the AI will automatically operate the browser and find the cheapest flight information. Isn’t this very convenient?
However, since regular browser use mainly relies on command-line operation, it can be difficult for those who are not familiar with the settings and operation.
The “ Browser-use WebUI “ we’d like to introduce here has a user interface that allows you to configure settings on screen, making it easier than ever to try out automated browser operations.
By the end of this story, you will understand the main features of the browser use WebUI, How to install it, and use cases and explore the innovative web browsing experience that this tool provides
Before we start! 🦸🏻♀️
If you like this topic and you want to support me:
like my article; that will really help me out.👏
Follow me on my YouTube channel
Subscribe to me to get the latest article.
What is Browser Use WebUI Overview?
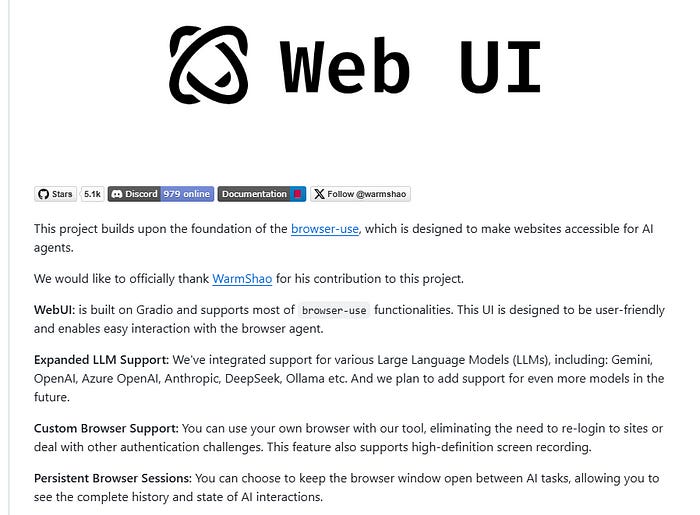
Browser Use Web UI is an innovative open-source project that provides AI agents with a graphical interface tool enabling browser interaction capabilities.
The project is built on the browser-use core framework and builds a user-friendly web interface through Gradio, allowing AI agents to interact with the browser easily.
The project supports a variety of mainstream large language models (LLMs), including Gemini, OpenAI, Azure OpenAI, Anthropic, DeepSeek, and Ollama.
It is particularly worth mentioning that the tool supports users to use their browsers to operate, solving common problems such as repeated logins and authentication
3. How to install Browser Use WebUI
let’s prepare in advance please make sure you have Python 3.11 or later if you don’t have it installed yet, download the installer from the official Python website.
In this story, the installation environment is on Windows 11. It is highly recommended to install the environment using uv
pip install uvuv is a tool that simplifies creating virtual environments and installing libraries. If you already have it installed, you can skip this step.
Once the installation is complete, you can check the version using the following command.
uv --versionCreate a folder for your project
Let’s create a create a folder called “browser-use-web-ui settings folder” on your desktop. Once you created a folder Move to the folder with the command
cd This is where we will place a set of browser automation tools.
Clone the repository
Now, we are going to git clone repository and move to the working directory
git clone https://github.com/browser-use/web-ui.git .

cd web-ui
Setting up the environment
Create a virtual environment with this command
uv venv --python 3.11In the VS studio terminal and activate it with
.venv\Scripts\activate4. Install dependencies
Install the required packages with the command
uv pip install -r requirements.txt
uv pip install python-dotenv gradio
5. Install Playwright
Playwright is a powerful browser automation framework developed by Microsoft that supports automated browser control, page screenshots/video recording, etc it can be installed with the “playwright install “ command
playwright install6. Setting environment variables
Copy the .env.example to .env and set the necessary environment variables, especially the API key for the language model you want to use, such as OPENAI_API_KEY or DEEPSEEK
cp .env.example .envIf you check with VSCode or Cursor, you will see that the .env file has been created. let’s edit the .env file and set it as follows:
CHROME_PATH = "C:\Program Files\Google\Chrome\Application\chrome.exe"
CHROME_USER_DATA = "C:\Users\YourUsername\AppData\Local\Google\Chrome\User Data"

ANONYMIZED_TELEMETRY=false

OPENAI_API_KEY= <Your API Key>
ANTHROPIC_API_KEY= <Your API Key>
GOOGLE_API_KEY=<Your API Key>
Also if you want to use a different model, which has a low API price, You can modify the model name where you will find the function name get_llm_model
browser-use/web-ui/utils/utils.pyRun Browser Use WebUI
Next, we run the browser-use-WebUI using this command
python webui.py --ip 127.0.0.1 --port 7788Once you run all the commands successfully, we launch the browser open a web browser and access the URL.
Tips: If you access the site from a browser other than Chrome (such as Firefox or Safari), it will be easier to enable the “Use Own Browser” function described below. If you are using Chrome, you can try it with Use Own Browser turned off.
http://127.0.0.1:7788
Testing out Browser Use’s WebUI
When you access the above URL, the following screen will open. There are several setting screens in the Browser Use WebUI. However, they are a little difficult to understand, and some of the settings are unclear as to what they are for, but I will provide an explanation.
AI Agent Settings
We will explain from top to bottom. There are two Agent Types: Standard An image of an agent that runs with the default settings described in the manual and Custom you can replace controller and system_prompt_class in your code to point to an agent with extended logic.
We Select Custom. Max Run Steps is the maximum number of steps to execute and Max Actions per Step is the maximum number of multiple actions to perform in one step.
Use Vision Select whether or not you want the agent to handle “visual information.” This setting enables a mode that can analyze “visual elements” such as screenshots and images of web pages. When off, the browser operates text-based only, ignoring visual elements.
Language model settings
It’s pretty comprehensive. LLM Provider specifies the provider of the model. You can specify anthropic, openai, gemini, azure_openai, deepseek, and ollama.
Model Name specifies the model name, such as GPT-4o or claude-3–5-sonnet-latest. Temperature specifies the consistency of the expression. Smaller numbers mean more consistency, while larger numbers mean more diversity in the output.
Base URL specifies the URL if you are operating a model in-house. API Key specifies the security key string required for connection.
It’s great that this update makes it possible to use Google’s Gemini and Deepseek. Depending on the model you select, image analysis may not be available. Also, models are frequently updated, so please keep track of the latest information.
Browser settings
Use Own Browser specifies whether to use the browser that the user normally uses. If you enable this, you can use the browser while retaining the session information of the logged-in account.
It is disabled by default, and a Chromium browser with no session information will be launched. Keep Browser Open prevents the browser from closing after completing the task. Headless Mode specifies whether to run the browser in the background.
It is recommended to disable it at first, launch the browser check its operation, and then run it in the background once you have worked out tasks such as periodic automatic time settings.
Disable browser security features This is useful for cross-site iFrames, etc., but be aware that it increases the risk when browsing suspicious sites Turn on the ability to record and capture screen captures of browser activity. Video files and screenshots will be output to the specified folder when turned on.
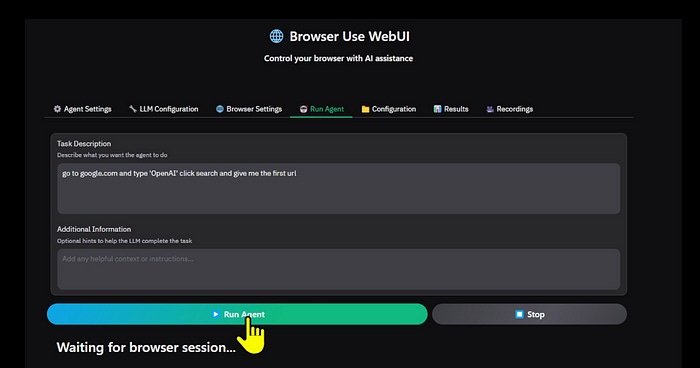
Running the Agent
Once you have finished the setup, on this final screen, enter the operations you want to perform on the browser in the form of a prompt and press the “Run Agent” button. A tab or window for the Agent to operate will then open, and the Agent will operate the browser.
Example 1 :
Let’s see this in action by performing a simple task:
We prompt as follows:
go to google.com and type 'amazon' click search and give me the first urlThe agent proceeds in steps. First, it looks at the tasks and makes an execution plan. It decides to move to Google.com. Then, in the input phase, it finds the search box, enters the text ‘Amazon,’ and prepares for search execution. Next, it clicks the search button and waits for the results page to load. After that, it extracts URLs from the first search result and marks the task as complete.
Example 2 :
In this next example, we search for flights
We prompt as follows :
Go to 'https://www.google.com/travel/flights?gl=TW&hl=en', check today's date, and let me know the departure
time of the earliest flight from Taipei to Tokyo
the agent starts to analyse the prompt and make a plan, deciding to go to Google Flight. It identifies today’s date, then enters “Taipei” as the departure city and “Tokyo” as the destination. please the agent forgot to click on only one way button which sometimes we need a human interfere Next, it clicks the search button and waits for the results page to load. After that, it extracts the departure time of the earliest flight and marks the task as complete.
Final Thoughts :
This time, I used Browser-Use’s Web UI to check the items that can be configured. In particular, I felt that being able to specify an existing browser with a session was a powerful feature, for better or worse.
On the other hand, if you give ambiguous instructions, the agent may interpret them arbitrarily or rely too much on search, and you may not get the answer you expected.
Humans are high-context creatures, after all. AI agents will try their best to answer any request, but sometimes they may give completely off-topic answers. Therefore, clear instructions are important. If you have decided on the business application you will use, narrow down the domain and give specific instructions.
If you add context information, specify the output format, and clearly state the branching and policy for when you are in trouble, the AI agent should head toward the goal without hesitation.
Reference :
🧙♂️ I am an AI Generative expert! If you want to collaborate on a project, drop an inquiry here or Book a 1-on-1 Consulting Call With Me.